Let's start by looking at how to display multiple videos on the screen using MPMoviePlayerController.
If you haven't used this class in previous iPhone projects, you may not
aware that it's not what you think of as a typical view controller in
Cocoa Touch; in fact, it doesn't inherit from UIViewController.
In MVC terms, it's a controller in the sense that it serves as an
intermediary between a video file or stream (the model) and the
on-screen view, but it doesn't fit into the UIKit
scheme of shuffling view controllers around as users navigate the app.
However, a new class included in iOS 3.2 fits that purpose
perfectly—the similarly named MPMoviePlayerViewController.
The
MPMoviePlayerViewController works just like any other UIViewController
subclass. You create one (specifying its contents using the initWithContentURL:
method), and push it onto a view controller navigation stack, just like
any other view controller. This usage is so simple that we're not going
to give it any more ink here. Instead, we'll focus on MPMoviePlayerController,
and demonstrate how to display content from several of these
controllers at once. We're going to create an app that shows a table
view, with each row displaying a video.
1. Creating the Video App Project
In Xcode, create a new view-based application, targeted for iPad only, and name it VideoToy. This will create a few items, including the VideoToyAppDelegate and VideoAppViewController classes.
Before we start working on the
code, take a few minutes to find some video clips that you can use in
this project. Any sort of iPhone-friendly video will do nicely. If you
don't already have some .mp4 or .m4u
files on your computer, you can find some on the Internet. An easy way
is to browse the iTunes U section of iTunes and download videos from
there. Then drag a few into your project.
2. Specifying Your Video Files
Now let's get started on the code. We're going to make a single change to VideoAppDelegate.m to specify the names of the video files we're using. We're passing this list along to the VideoAppViewController instance.
- (BOOL)application:(UIApplication *)application
  didFinishLaunchingWithOptions:(NSDictionary *)launchOptions {
  [window addSubview:viewController.view];
  [window makeKeyAndVisible];

  viewController.urlPaths = [NSMutableArray arrayWithObjects:
      [[NSBundle mainBundle] pathForResource:@"looking_for_my_leopard"
        ofType:@"mp4"],
      [[NSBundle mainBundle] pathForResource:@"knight_rider_season2intro"
        ofType:@"mp4"],
      [[NSBundle mainBundle] pathForResource:@"muppets" ofType:@"mp4"],
      [[NSBundle mainBundle] pathForResource:@"opengl" ofType:@"mp4"],
      nil];
  [viewController.tableView reloadData];
  return YES;
}
This
code references a few properties that don't yet exist in
VideoToyViewController, but don't worry. We're going to turn
VideoToyViewController into a UITableViewController subclass that holds onto a list of video files to display.
The GUI will be created entirely from the table view delegate and dataSource methods, so we have no need for the VideoToyViewController.xib that was created along with the project. Delete VideoToyViewController.xib from the project. Then open MainWindow.xib so we can remove the reference it contains to that .xibVideoToyViewController object, open the attribute inspector, and clear out the Nib Name field. file. Select the
Next, make the following changes to VideoToyViewController.h:
//  VideoToyViewController.h
#import <UIKit/UIKit.h>
#import <MediaPlayer/MediaPlayer.h>
@class VideoCell;
@interface VideoToyViewController : UITableViewController {
  NSMutableArray *urlPaths;
  IBOutlet VideoCell *videoCell;
}
@property (retain, nonatomic) NSMutableArray *urlPaths;
@end
Here, we change the superclass, declare the urlPaths
property that we referenced earlier in the app delegate, and also lay
the foundation for a more detailed part of the GUI by creating the
videoCell instance variable. If you're wondering why we declared
videoCell as an IBOutlet, when this class isn't loading its GUI from a .xib file, then good for you—you're really paying attention here! That will be explained in just a minute, so hang in there.
Switch over to VideoToyViewController.m, and add an import near the top:
//  VideoToyViewController.m
#import "VideoCell.h"
Now add these methods to define the basic properties of the table view that will be displayed:
- (CGFloat)tableView:(UITableView *)tableView
  heightForRowAtIndexPath:(NSIndexPath *)indexPath {
  return [VideoCell rowHeight];
}
- (NSInteger)numberOfSectionsInTableView:(UITableView *)tableView {
  return 1;
}
- (NSInteger)tableView:(UITableView *)tableView
  numberOfRowsInSection:(NSInteger)section {
  return [urlPaths count];
}
3. Using the videoCell Outlet to Load the GUI
Now for the slightly trickier spot and the explanation for the existence of the videoCell outlet. The following shows a good way to load a table view's cell content from a .nib file, rather than defining your layout entirely in code.
- (UITableViewCell *)tableView:(UITableView *)tableView
  cellForRowAtIndexPath:(NSIndexPath *)indexPath {
  VideoCell *cell = (VideoCell *)[tableView
    dequeueReusableCellWithIdentifier:[VideoCell reuseIdentifier]];
  if (!cell) {
    [[NSBundle mainBundle] loadNibNamed:@"VideoCell" owner:self
      options:nil];
    cell = videoCell;
    cell.selectionStyle = UITableViewCellSelectionStyleNone;
[videoCell autorelease];
    videoCell = nil;
  }
  cell.urlPath = [urlPaths objectAtIndex:indexPath.row];
  return cell;
}
The first line tries to find
a cell to reuse, as usual. If it doesn't find one, then instead of
programmatically creating a cell, we load one from a .nib file. The trick is that we load this file with self as the File's Owner, which will have the side effect of setting the videoCell outlet to point to whatever the File's Owner proxy in the .xib file has its videoCell outlet pointing to.
Remember to add a little cleanup for the new urlPaths property:
- (void)dealloc {
  self.urlPaths = nil;
  [super dealloc];
}
Now use the New File Assistant to make a new UITableViewCell subclass called VideoCell. Open its .h file, and add the bold lines shown here:
//  VideoCell.h
#import <UIKit/UIKit.h>
#import <MediaPlayer/MediaPlayer.h>
@interface VideoCell : UITableViewCell {
  IBOutlet UIView *movieViewContainer;
  IBOutlet UILabel *urlLabel;
  NSString *urlPath;
  MPMoviePlayerController *mpc;
}
@property (retain, nonatomic) NSString *urlPath;
@property (retain, nonatomic) MPMoviePlayerController *mpc;
+ (NSString *)reuseIdentifier;
+ (CGFloat)rowHeight;
@end
Switch to VideoCell.m, and remove the initWithStyle:reuseIdentifier: method, since we won't be needing it. Then make the rest of the file look like this:
//  VideoCell.m
#import "VideoCell.h"
@implementation VideoCell
@synthesize urlPath, mpc;
+ (NSString *)reuseIdentifier {
  return @"VideoCell";
}
+ (CGFloat)rowHeight {
  return 200;
}
- (void)setupMpc {
  if (mpc) {
      // we've already got one of these, time to get rid of it
      [mpc.view removeFromSuperview];
      self.mpc = nil;
}
  if (urlPath) {
      NSURL *url = [NSURL fileURLWithPath:self.urlPath];
      self.mpc = [[[MPMoviePlayerController alloc] initWithContentURL:url]
      autorelease];
      mpc.shouldAutoplay = NO;
      mpc.view.frame = movieViewContainer.bounds;
      [movieViewContainer addSubview:mpc.view];
  }
}
- (void)setUrlPath:(NSString *)p {
  if (![p isEqual:urlPath]) {
      [urlPath autorelease];
      urlPath = [p retain];
      if (urlPath && !mpc) {
      [self setupMpc];
      }
      urlLabel.text = urlPath;
  }
}
- (void)awakeFromNib {
  if (urlPath && !mpc) {
      [self setupMpc];
  }
  urlLabel.text = urlPath;
}
- (void)dealloc {
  self.urlPath = nil;
  self.mpc = nil;
  [super dealloc];
}
- (void)setSelected:(BOOL)selected animated:(BOOL)animated {
  [super setSelected:selected animated:animated];
  // Configure the view for the selected state
  [mpc play];
}
@end
In this code, we're referring to a UILabel and an MPMoviePlayerController within our GUI, as well as a plain-old UIView. The MPMoviePlayerController that we create exposes a property called view,
which lets us access the view object it uses to render the video. We
don't know the class of this view—it's essentially a private class that
the Media Player framework doesn't expose to us. When the time comes,
after the .nib file has loaded and the urlPath has been set, we create an MPMoviePlayerController, grab its view, and put it into our view hierarchy by making it a child of the empty UIView.
4. Creating the VideoCell User Interface
Now use the New File Assistant to create a new empty GUI file called VideoCell.xib. Open the new file in Interface Builder, add a VideoCell instance from the Library, and resize it to 768 by 200. Use the attribute inspector to set the identifier to VideoCell,
just as we did in code. Add a label on the left to display a URL, and
use the attribute inspector to configure it for 0 lines and character
wrap. Also add a plain-old UIView on the right. Figure 1 shows the basic layout.
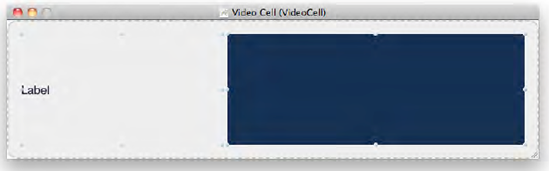
Connect the outlets from VideoCell
to the appropriate objects. Use the size inspector to configure the
autosizing attribute of each of them so that they'll expand
horizontally, while still remaining tied to their respective window
edges when the cell is resized (such as when the iPad rotates).
Finally, use the identity inspector to make File's Owner a VideoToyViewController, and connect its videoCell outlet to the one you just created.
5. Running the Video App
Now you should be able to
build and run the app, and see the vertical list of video views. They
will all be empty rectangles, except for the last one displayed, which
will probably start playing on its own. Touching any other cell in the
table view will activate the movie view in that row and start playing
it. As you activate each video by tapping its row, you get a full set
of video controls, including a button that switches to full-screen
display.
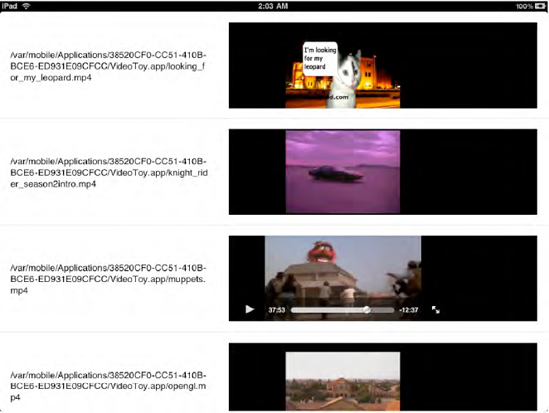
You will also notice one of
the main limitations of using multiple video views: only one of them
can play at a time! Starting playback on an MPMoviePlayerControllerFigure 2 shows the display after loading four videos and playing each of them a bit. will simultaneously pause playback on any others that are running.
You now have the beginnings of
a sort of video browser. This could be useful in a number of
applications, letting you preview several videos in a list. That's
fine, but what if you also wanted to display the video on an external
screen? You'll be able to do that with a few adjustments, as described
in the next section.